February 6, 2020
Creating Tabs Look-alike with CSS
What I am using
- Visual Studio Code
- Macbook
First thing first:
- Create a folder and name it anything you’d like. For example: “My First CSS” or “Pretty Tabs” ?? Whatever you’d like!
- Create a file and name it index.html <- This is where you will see the code. As we will be doing internal styling for this small assignment, index.html is all that you need.
- Open up index.html and lets get it all set up!
INDEX.HTML
When you are on index.html, remember to add these:
<!DOCTYPE html>
<html>
<head>
<title>Title of the document</title>YOUR CSS WILL BE HERE
</head><body>
YOUR CODE WILL BE HERE
</body></html>
You can always google this to extract this basic code but it’s good to know them. Plus, it is not really hard to remember them! Just try to humanize the code. <body> </body> is where you write all the instructional codes. CSS is usually done externally and saved as NAME.css. However, for the purpose of this short tutorial, we are having them internally which means the <style></style> will be inside <head></head>.
I usually produce the output I want first and work backwards. So inside <body> </body>, type in your first code:
<div class=”tab-container”>
<div class=”tab”>
TAB 1
</div>
<div class=”tab”>
TAB 2
</div>
<div class=”tab”>
TAB 3
</div>
</div> <!—CLOSE YOUR MAIN CONTAINER!–>
Now that you’ve established the name of your div class for these tabs, time to style them! Head over to your <head></head> and type…
<style>
.tab-container {display: inline-block;
}
Display: inline-block tells computer you’d like to display each div next to each other. However this works when you add “float: left” to your <div>. There are a lot of methods to alignments with CSS and this is only one of the many ways.
Next, let’s style the child tab!
.tab {
border: 1px solid #9a9a9a;
color: #00000;
font-family: verdana;
padding: 10px 20px 10px 20px;
float: left;
border-radius: 20px;margin: 20px 10px 0px 10px;
}</style>
About the code:
Border… is pretty straight forward so I won’t talk about this.
#9a9a9a or #00000 is the colour code you tell the computer you’d like to produce.
Font-family: verdana; You can choose the fonts that are available everywhere such as Arial, Verdana, Times News Roman…
Float: left; keeps your div next to each other
Padding and Margin follows the same rule (read it from the left to right):
TOP RIGHT BOTTOM LEFT.
You tell the computer how many px / % / distance units you’d like your object to be on. For instance for margin, in english term it will be, 20px from top, 10px from right, 0px from bottom, 10px from left.
The results
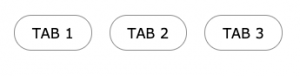
The next challenge now is to make them change colour as you hover your mouse on one of the divs! Stay tuned for the next tutorial!
Leave a comment
Subscribe to receive coding and design tips!